Data Engineering with dbt Core
Background Previously, I watched and blogged a...

This article is originally published in this link at Medium.com. I decided to split the original article into two parts for ease of reading. The files are also available at this repo.
Scratch your own itch.
This is the advice that I always give whenever someone asks me how to learn programming. You have to choose projects that are relevant to you — either in your work or personal life.
Going to tutorials in Youtube, reading programming books, copying code from Reddit posts, etc. are Ok but they are not as effective as solving your own problems.
In this post, I’m going to show you how to build a crude accounting database using SQLite.
So, why create an accounting database? Why not just copy public data, shove them to SQLite, and practice SQL from there?
The reason is that creating an accounting database is advance enough to cover all the aspects of databases and SQL — from queries, joins, views and CTEs.
Coming from an accounting background, I think that this is the best project to learn SQL. After all, programming is a tool to solve problems. Hence, might as well “solve” a difficult one to learn SQL.
I got the inspiration to create an accounting system using SQL by observing how Xero works. For those who are not familiar with it, Xero is a cloud accounting software originated in New Zealand. It has now expanded to Australia, the US, Canada, and the UK.
The good thing about Xero is that it has a nice clean interface and a lot of apps to choose from to extend its functionality.
Disclaimer: I’m not a developer at Xero and these observations may not exactly correspond to how the system works as it is always updated. Certainly, the SQL presented here is not the exact SQL design that Xero use as their system needs to scale. But this is a very interesting project so let’s do it!
Before you get excited too much, let’s have a crash course first on accounting.
The fundamental accounting equation is
Assets = Liabilities + Equity
That equation has basically three parts
The right-hand side describes how the assets were financed — either thru Liabilities or Equity.
We can expand the above equation to break down the Equity
Assets = Liabilities + Beginning Equity + Revenues — Expenses
These 5 accounts — Assets, Liabilities, Equity, Revenues, & Expenses — are the account types that you typically see in an accounting system.
Then there’s the concept of Debit and Credit. I could go on and discuss these two in-depth but for this post, all you need to know is that in every transaction:
Debit = Credit
These two equations generally govern what’s happening in the whole accounting cycle. These two equations will also serve as a guide in creating our own accounting database.
The important thing to remember is that Xero is designed in such a way that it will be easy to use for business owners in the day-to-day operations of the business.
As such, it designed around transaction cycles and internal control.
The basic transaction cycles are the following
Xero implements these cycles as follows
Sales Cycle
Sales are entered into Xero using Invoices. Imagine the business issuing actual paper invoices for sales via cash or on account. This is the exact thing that Xero wants to replicate.
The invoices can be printed directly from the software and they are automatically numbered in increasing order.
Under the hood, invoices increase the Sales account and Accounts Receivable (AR) account.
Purchases Cycle
Bills are entered into Xero using Bills. Again, imagine the business issuing actual bills for purchases via cash or on account. This is the usual case for utilities and inventory. This is also the thing that Xero wants to replicate.
The bills can be printed directly from the software and can be used to supplement any approval procedures done by the business.
Under the hood, bills increase the Purchases account and Accounts Payable (AP) account.
Cash Cycle
This involves all transactions pertaining to Cash. There are 4 types
For internal control, you need to understand the concept of system accounts.
Xero has a comprehensive article for understanding system accounts here. But for our purposes, we’re only going to discuss the following system accounts
These accounts cannot be used in Manual journals. This means that Xero wants you to use Invoices, Bills, and Cash Transactions (Invoice Payments, Bill Payments, Received Money, and Spent Money) to support the balance of these accounts. This is Xero’s implementation of internal control if you will.
Of course, you can use the non-system version of the AR, AP, and Bank accounts by creating similar accounts in the Chart of Accounts (COA) to mimic them. However, you cannot use special reports that were made for these accounts, like Outstanding AR and AP reports.
Designing an accounting is really complex. It will take multiple blog posts just to cover this topic. Hence, for simplicity, we’re going to make the following assumptions.
After designing our database, the reader can lift these assumptions and try mimicking Xero as much as possible.
Now before reconstructing our version of Xero’s database structure, let’s have a crash course on databases.
A database is a collection of tables. Each table consists of rows of data called records. The columns are called fields.
The program to work with a database is called a Database Management System or DBMS. As a simple analogy, DBMS is to Excel program, database is to Excel workbook and table is to an Excel worksheet.
There are two main differences between a database and an Excel workbook.
Data presentation is separate from data storage
Meaning, you cannot edit data in a database by going over the directly to the data and editing it. (Other DBMS programs have GUIs that allow you to directly access data in a database and edit it like a spreadsheet. But under the hood, that action issues an SQL command).
Tables are usually linked to each other to form a relationship
Relationships can be one-to-one, one-to-many, or many-to-many.
One-to-one relationship means “a table row is related to only one row in another table and vice versa”. An example would be employee name to tax identification number.
This kind is usually included in a single table as there’s really no benefit of separating the data into two tables.
One-to-many on the hand means “a table row is related to only one or more rows in another table but not vice versa”. An example is Invoices to InvoiceLines. An invoice may have multiple lines but an invoice line belongs only to a particular invoice.
And as you might have guessed it, many-to-many means “a table row is related to only one or more rows in another table and vice versa”. An example would be a system that implements partial payments.
An invoice may be paid partially by different payment transactions and a payment may pay different invoices partially.
How would a database knows these relationships?
It’s simple. It’s through the use of primary and foreign keys.
Primary keys are necessary to distinguish one row from another. They uniquely identify each row of data in a table.
Foreign keys, on the other hand, are primary keys from another table. Hence, by relating the primary keys and foreign keys, the database relationships are persisted.
For one-to-many, the “one” side contains the primary key and the “many” contains this primary as its foreign key. In our above example, to get all the lines belonging to an invoice, we query the InvoiceLines table where the foreign key equals a particular invoice number.
For many to many, the relationship is broken down into two one-to-many relationships through a use of a third table called the joining table. For example, our partial payment system will have the Invoices table, Payments table, and InvoicePayments table as the joining table. The primary keys of the InvoicePayments table will be a composite key consisting of the primary keys for the Invoices and Payments table as follows
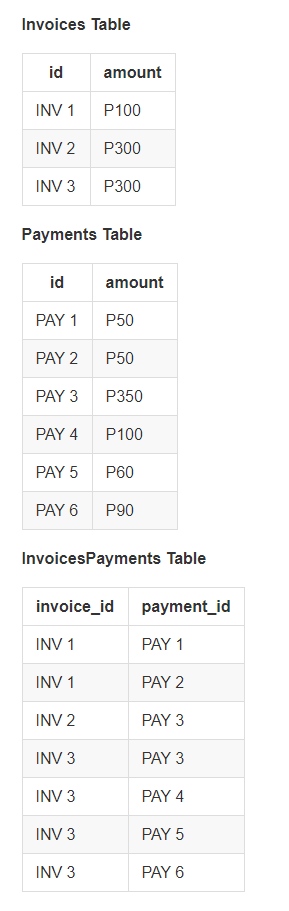
Take note that the joining table does not contain any other data as it does not have other purpose aside from joining the Invoices and Payments tables.
To get the invoices paid by a certain payment transaction, say PAY 1, we join the two tables through the joining table and query for the payment_id = "PAY 1".
That’s it for the basics of a database. We’re now ready to design our database.
Now that we have a basic understanding of Xero to start creating a rough sketch of its database structure. Take note that I’m going to use Table_Name format for the table names. I’m also going to use pluralized names for the table names.
For the Sales Cycle, we’re going to have the following tables
InvoicesCustomers — a customer can have many invoices but an invoice can’t belong to many customersInvoice_Payments — remember our assumption for now that there’s a one-to-many relationship between Invoice_Payments and Invoices respectively (no partial payments)Invoice_Lines — this is the joining table between Invoices and Accounts. An account may appear in multiple invoices and an invoice may have multiple accounts.AccountsFor the Purchases Cycle, we’re going to have the following tables
BillsSuppliers — a supplier can have many bills but a bill can’t belong to many suppliersBill_Payments — remember our assumption for now that there’s a one-to-many relationship between Bill_Payments and Bills respectivelyBill_Lines — this is the joining table between Bills and Accounts. An account may appear in multiple bills and a bill may have multiple accounts.Accounts — same with the above in the Sales Cycle. Just putting here for completeness.For the Cash Cycle, we’re going to have the following tables (Payment tables were already created above)
Received_Moneys — may have an optional customer_id foreign keyReceived_Money_Lines — this is the joining table between Received_Moneys and AccountsSpent_Moneys — may have an optional supplier_id foreign keySpent_Money_Lines — this is the joining table between Spent_Moneys and AccountsConceptually, our database structure is as follows:
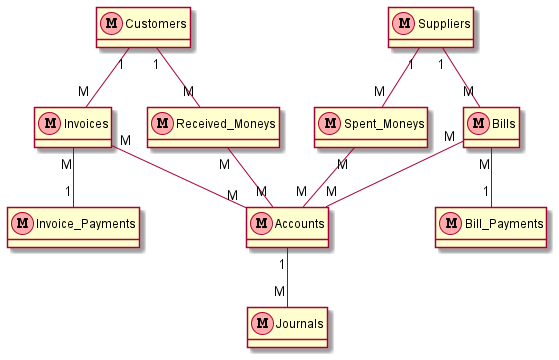
This diagram is called Entity-Relationship Diagram or ERD in the database parlance. One-to-many relationships are designated by 1-M and many-to-many by M-M.
The joining tables are not shown in the above diagram as they are implicit in the tables with many-to-many relationships.
That’s it for now. In this article, we learned basics of accounting and SQL. We also have the initial design for our database.
Next, we’ll implement our design in SQL. The Part 2 of this article is available here.
Background Previously, I watched and blogged a...
This article is originally published in this...
This article is originally published in this...
Background As I’m looking for ways to learn mo...